Materials
For main sculpture:
For traditional mache skin:
For claws
For whiskers
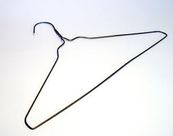
- Wire coat hangers (dry cleaners still use them).
- Wire cutters (pliers)
- Paper board (cereal or cracker box)
- Newspaper (and phonebook paper)
- Masking tape
For traditional mache skin:
- flour
- water
For claws
- White Sculpey clay (bake to harden)
- Hot glue
For whiskers
- Horse tail hair (or there are plastic whiskers at hobby stores)
Paper Mache Clay Recipe
For skin and sculpting features. Thanks to Ultimate Paper Mache website!
1 roll of toilet paper (Angel Soft is good)
Water
3/4 cup of white glue (Elmer’s glue-All)
1 cup of joint compound
1/2 cup white flour
2 tablespoons linseed oil (I just omitted, but you could use mineral or vegetable oil too)
Unroll and wet the toilet paper. It becomes about 1 1/4 cup of paper wet and squeezed out (don't squeeze out too much water).
Chop it up, then mix it to a pulp (with a mixer).
Mix the other ingredients in until there's no lumps. The consistency is like cookie dough.
This keeps very well in a tupperware container. And it's really easy to make another small batch if you need just a bit more.
Apply a thin skin over your armature. Sculpt with popsicle sticks, knives, toothpicks, etc.
Dries easily overnight. One technique I found useful was to add a thicker blob in places and let it dry just enough to form a kind of skin or crust. They you can re-shape that part with your fingers or a tool and it doesn't stick.
Once it dries you can sand it down too.
Create armature and pad out with newspaper or phonebook paper
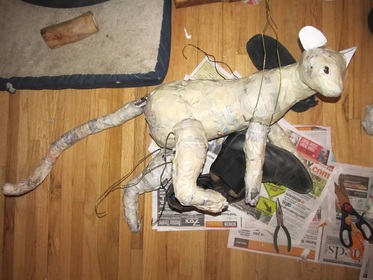
The main sculpture is made of an internal armature or skeleton. We used wire coat hangers. Then twist newspaper into "ropes" and wrap these around the hangers. Then you can bend and reshape the body part as desired.
We made the head, tail, torso, and legs separately and attached them later. This was kind of a pain and for smaller sculptures I think I might make the whole skeleton and then pad it out and tape it.
Attach limbs, head, torso with masking tape. Make sure it stands up in the position you choose.
See Gourmet Paper Mache for detailed instructions and photos of the process.
Cover with masking tape
This will be the base layer to which the mache adheres.
We still haven't attached the tail yet. Fossas have really long tails proportionately and we weren't sure how that would work because we wanted it realistic, not dragging on the ground.
We mached the tail so it would be stiff and left 3 pieces of 6 inch long wire at the top which I stuck into the back end. Once we taped and mached it (extra layers), the tail connection was quite strong.
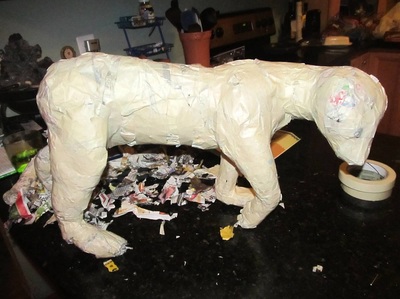
Mache

The paper mache part was just the traditional white flour and water with a little bit of salt in it (to retard mold).
Dip in the pieces of newspaper into the "paste" and lay overpapping, smooth. Let each layer dry for a day or so.
You may be able to skip this part and go straight to using the paper mache clay. We haven't tried it that way.
One reason I was glad we had used the regular mache to make a skin is when the fossa needed some surgery, the hard mache shell held it all together when I sawed off some chunks.
There are photos of the stages of his creation on a public Shutterfly site: http://fossapapermacheproject.shutterfly.com/
Add Ears and Eyes

The ears are paper board from a cereal box, cut out and taped on.
We bought taxidermy red fox eyes online. The eyes are so important a focal point and we were going for realism. They were only about $8. You could also just make mache balls, then paint to look like eyes.
I hot-glued the eyes into the sockets.
I had to build up eye, nostril, lip, and other face and toe details using the mache clay.
There's one of the fossa pictures I printed for reference. I used many different pictures to cover different angles, positions, and expressions. Our final version is a composite.
Fossa covered with paper mache clay skin.

Spread like paper mache clay over the dry paper mache like frosting.
You can build up in places, add layers, and sculpt details. We just used toothpicks, knives, and popsicle sticks.
You can build up in places, add layers, and sculpt details. We just used toothpicks, knives, and popsicle sticks.
Surgery With a Knife

After we saw the finalized shape we concluded that the face looked too much like a cute lion cub and not enough like a lean predator. So I sawed off some chunks to correct it. Then we re-taped and re-clayed the adjusted areas. It was pretty easy as it turned out.
Re-skinned
Covered with mache clay, with her new more "fossa-like" features.

Top view showing tail area
|

Detail of fur texture
We added texture using a serrated knife and stiff paint brush to look like fur.
|

|

|
Sand, detail, and paint

We just used acrylic paints. Started with a layer of burnt sienna, layered some browns and tans. Finished with a dark brown "wash" (diluted paint) to get into the grooves and highlight the fur texture.
Poked little holes to insert the whiskers, using hot glue to attach.
Created claws with Sculpey bake-to-harden clay. We made a bunch of claws and then just used the ones that were the right size for each toe. Attached with hot glue before final painting.
The ears have some mache clay hair tufts.
Poked little holes to insert the whiskers, using hot glue to attach.
Created claws with Sculpey bake-to-harden clay. We made a bunch of claws and then just used the ones that were the right size for each toe. Attached with hot glue before final painting.
The ears have some mache clay hair tufts.

